Friday, December 17, 2010

Ornaments

Oops~ so in my previous post I had mentioned that I was going to be back to share some more goodies from my trip and a recipe...well...I honestly apologize!! I think since I was gone for so long...I was going through 'rubber withdrawal' (YES~ that's a real symptom in stamp land!). My fingers have been all inky and I even cut myself on my paper cutter!! Not sure how I managed that one...but when your index finger has a boo boo with the hand you do EVERYTHING with it makes for a tough time stamping!!
This ornament I actually made right before I left and will be one of the goodies that my Holiday Open House attendees will be able to make. Here is a side photo:
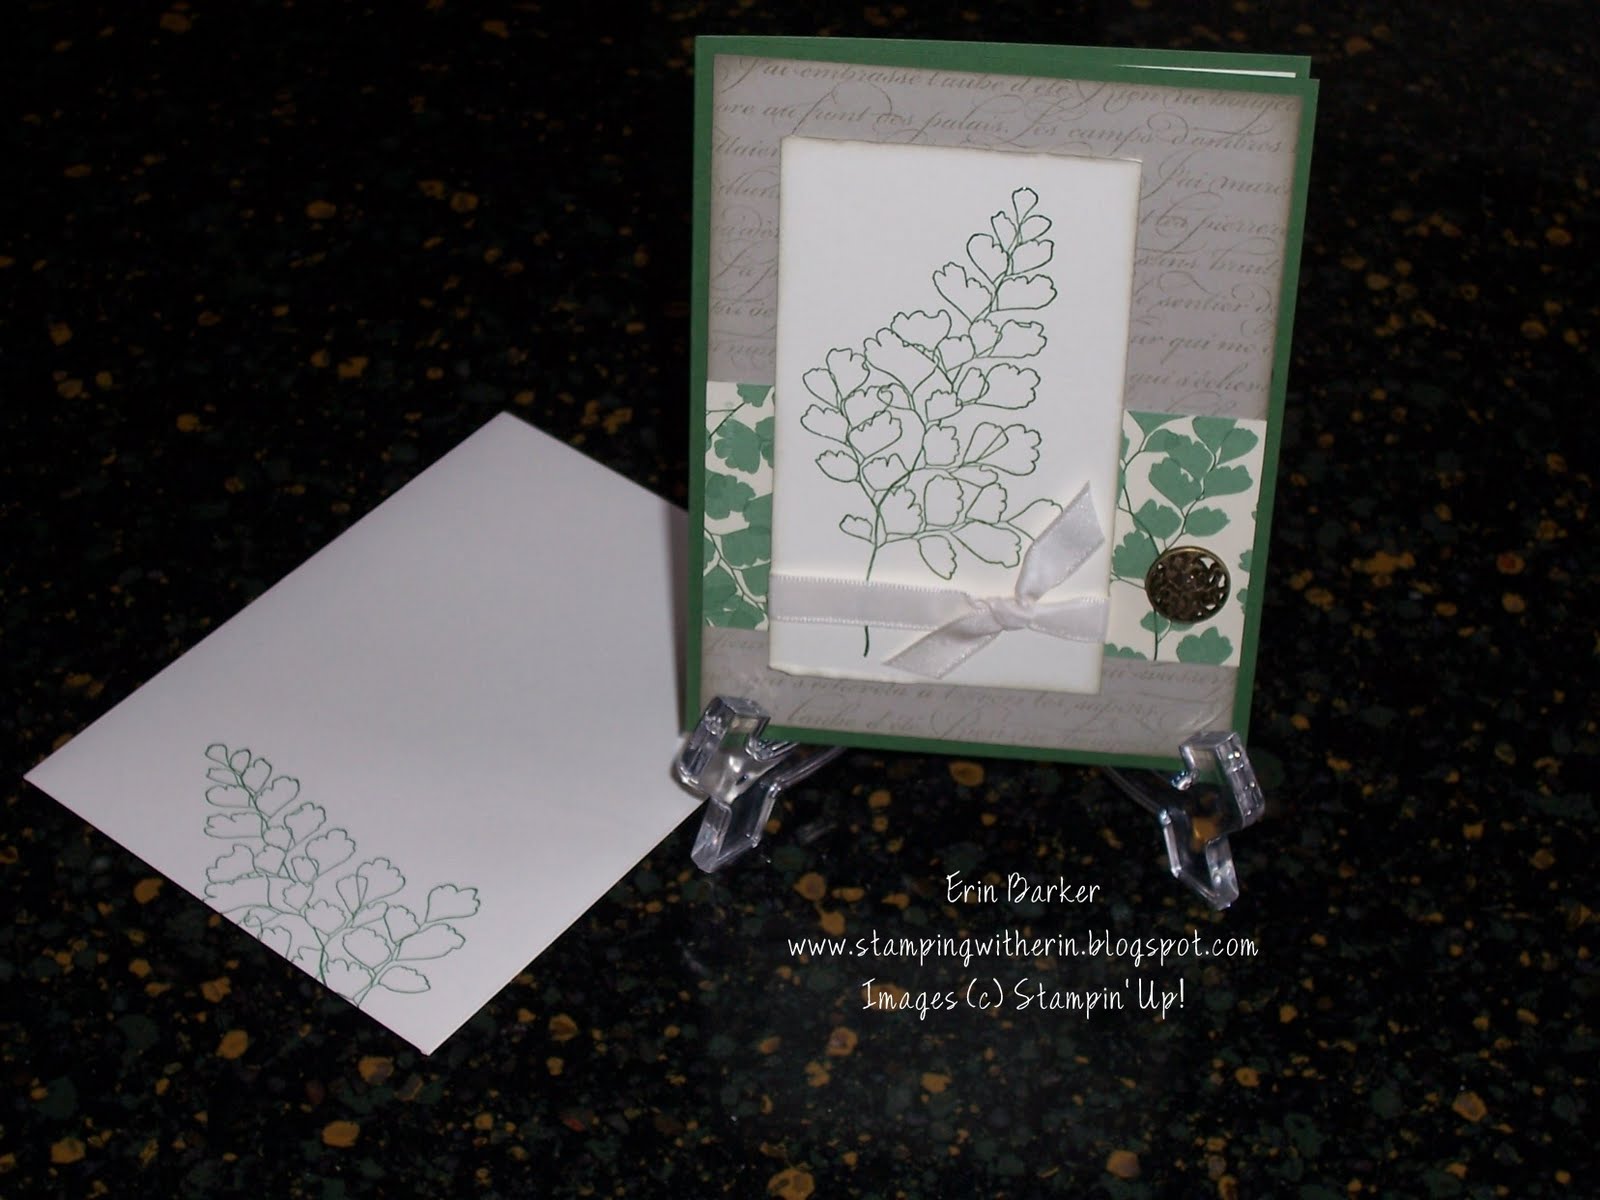
Details:
Non SU!- Ornament & Snow (craft/hobby store)
Stamp set: Welcome Christmas (118736 W) (120597 C)
Ink: Always Artichoke Classic pad
Card Stock: Vellum
Accessories: paper piercer, 2 1/2" circle punch, Always Artichoke binding ribbon
Now here is another ornament that I made while I was with my mom in AZ. It measures 7 1/2" in diameter and uses our Deck the Halls fabric (121716). Very cute to hand on a door or along with a wreath. I have a few pictures to show you on how it was created...and I was oh so excited that even the back looked good! I can never even sew in a straight line...but good ol' mom showed me a few cool tricks.
I made a total of 4 of them and for the back I used muslin. A few I stuffed with batting. Now...the top is really cool! It's tin foil~ I know right?? I found this great tutorial from the Missouri Quilt Company. Click here to view. The video will demonstrate how the foil was created for the topper. If you have any questions, just ask!! ~Erin
Now as promised: I mentioned I would share with you a delicious recipe for Tamale Pie so here it is! Enjoy and let me know if you enjoy it! Great hot meal (not too spicy) for a cold winter day!
Tamale Pie
Serves 6
For a gluten-free version, substitute a gluten-free baking mix for the flour and baking powder.
Cooking spray
15-ounce can black beans, drained and rinsed
15-ounce can fire-roasted, diced tomatoes
15-ounce can of corn drained
1 tablespoon chili powder
1 teaspoon ground cumin
1/2 teaspoon paprika
1/4 cup diced onion
1/2 cup shredded cheddar cheese
Corn Bread Topping:
3/4 cup cornmeal
1 1/4 cup flour
1 teaspoon baking powder
1 cup milk
1/4 cup sugar
1 large egg
1. Spray the inside of a 4 qt. slow cooker with cooking spray. Pour in the filling ingredients- the beans, tomatoes, corn, spices, onion and cheese~ and stir well taking care to evenly distribute the spices.
2. In a seperate bowl, mix the corn bread topping. Pour the batter over the filling, spreading it with a spatula. Cover and cook on low 4-7 hours, or on high doe 2-4 hours.
Per serving: 380 calories, 6g total fat, 3 g saturated fat, 50 mg cholesterol, 630 mg sodium, 68 g carbohydrates, 8 g fiber, 15g sugars, 15g protein.

Tuesday, December 14, 2010

The BIG day is almost here...

I can't believe how quickly the holiday season is approaching. I spent two weeks recently in AZ visiting my mom...and WOW I miss the weather!! The above photo was the ugliest day...and isn't it ironic that there was a rainbow? We were sitting at her kitchen window and a few clouds quickly rolled in..and it spit about 6 drops of rain! Almost everyday I was able to go out and enjoy the sunshine and warmth. You would think it's difficult to get ready for the holidays when it's so sunny and warm (mid 70's) but you could fell the magic of 'CHRIST'mas in the air. She has a lovely church and I attended mass with her twice and enjoyed a fabulous luncheon. Tomorrow I will share a delicious recipe called Tamale Pie~ YUM! Everyone brought a dish to share and there were several receipes I jotted down (so stay tuned for others!). It was great meeting all of her friends and I now know how she has been able to live there while her husband has been working from southern CA for the past 3 1/2 years. During my visit she received wonderful news that he would be coming back mid January to stay! He works for Raytheon and had been transferred and now is able to come home...so yay for mom!! I helped mom decorate for Christmas and I brought with me our Deck the Halls fabric (121716)...she is 'sew' crafty and I knew she would help me get creative and make something festive.
Here is what I made...(with Mom's help!!)
I know....just BEAUTIFUL!! Just wait...we will have more fabric that coordinates with stamps and accessories in the next Occasions Mini catalog!! I just might have to head back to AZ for some more 'sew' cute crafts!!
Here are a few close up pictures...I was completely WOWED!
She has the lates and greatest Bernina machine that is OUT of this world... 'Dear Santa' (wink wink)~LOL!
Cute huh?? I think the coolest part was watching the magic happen right before my eyes. These pictures show it best...I was unfamiliar with this technique or material called 'free standing lace' or FSL. The material that looks like plastic allows the machine to stitch the programmed design and 'create' the lace image, when you are done all you do is rinse the completed ornament under water and it dissolves...it was SO cool!! Here is right before it was rinsed...this is where I was just blown away and ready to pour a glass of wine and celebrate my/mom's clever creation!! I ended up making three: one for each of the kids back home!!
Here is Aiden's (snowflake).
Regan will receive the angel.
Last but not least, my oldest Tyler will get the tree.
Now...before you nod off to sleep...there is one more thing I would like to share with you in this evening's post. I hate that I have not posted anything since I left...meant to do some blog work while I was away..but it's easier on my own computer and the only way I was able to take photos was with my cell phone...so I apologize if the photos are not very clear, but atleast you get the idea!!
This upcoming Saturday (Dec. 18th) is my Holiday Open House and I have a TON planned. SNEAK PEAK: This is one of the cards that will be part of the days 'Make & Takes'!!
This card is BEAUTIFUL in person...hard to see the shimmer from photo~ but it's indeed a beauty!!
The picture on the right shows how it opens.
Card details:
Stamp Set: Serene Snowflakes (115438), All Holidays (114916)
Card Stock: Very Vanilla, Night of Navy, Brushed Gold
Accessories: Antique Brads (117273), Sponge Daubers (102892),Champagne Mist Shimmer Paint (116806), Extra Large Decorative Label punch (120907), 1/16" handheld punch (101227).
You will be able pick and choose the creations you would like to recreate. If you live in the area, please stop by!! You can enter in door prize drawings, make cards, ornaments and more!! There will be stamp sets and accessories available for purchase along with handmade treats and other handmade gifts. If you have any questions give me a buzz (540) 667-3799. Or email stampingwitherin@yahoo.com .
So be sure to check my Stampin' Up! website for upcoming scheduled events and to purchase any of the products you have seen here!! Happy Stampin' & Brrrrrr stay warm!! ~Erin

Tuesday, November 23, 2010

Remind you of something??

It's basically the wreath from the cover of the Holiday Mini-Catalog!! So...in an earlier post I had mentioned that fabric was SO not my friend...seriously I am not joking!! So I really can't believe that I made this!! I had tons of help from my friend and downline Anne (thanks Anne!!). She made one using the Candy Cane Christmas fabric (121715). This one uses our Deck the Halls fabric (121716) it just matched my home decor so much more...and it is now hung in my newly painted bathroom in our basement~ LOVE IT!! It will be there to stay forever and ever!! Here is a close up of the flower embellishments:
Instructions on how to make this wreath and a bunch more cute projects come with the fabric so make sure you hang on to your instruction sheet. Now...I can normally follow instructions but I have to admit that in making the yo-yo flowers I had some difficulty...but it was probably just that I wanted it to be PERFECT and I am new at sewing...so I ended up going to YouTube and searched several 'how-to' videos and wound up ordering a a product called the Yo-Yo Maker made by Clover~ Sew easy !! I know I will be ordering some more sizes and shapes in the future because Stampin' Up! will have more fabric coming in the next catalogs....Shhhhh!!! Isn't that excited??? Just wait until you see the next Occasions Mini Catalog...its going to 'freak your freak out'!
Speaking of fabric...here is a cute little card I made using a scrap piece I had laying around...and I didn't even need to sew it!! All I did was placed a strip of sticky strip and stuck the fabric on scrunching it up as I went along. Now the card I took a picture of at an angle to show how it was scored: start with a standard card 4 1/4" x 11". Fold in half as you normally would, then score a 1/4" up from that center fold and down a 1/4" from the center. Mountain/Valley fold to create a gap in your card to hold a little treat:
The greeting inside is one of our personalized stamps: I love these because if there is a saying you love or a special nickname for a loved one...you can have Stampin' Up! design what you want!! The candy I just attached with two glue dots.
Remaining card details:
Card Stock: Sahara Sand, Very Vanilla, Early Espresso
Stamp Set: Tags Till Christmas (120847 W) (121169 C)
Access: Decorative Label punch (120907)Vintage Wallpaper embossing folder (120175), Deck the Halls Big Designer Buttons (121002), linen thread (104199), stampin' write markers.
Happy Stampin'~Erin

Monday, November 22, 2010

Spectacular Savings!!

It's SPECTACULAR!!
Just announced today~ Stampin' Up! has a great promotion that will run for 9 days!! Click here to view an online PDF that contains all savings some up to 50% off!! Have you been thinking about ordering the new My Digital Studio?? Order today...at half off!! Plus our fabric (yup...that too is 1/2 off!!) There is so much more to mention...don't wait~so check it out!!
Plus when you shop online and spend a minimum of $150 your shipping is FREE!! So get your friends together and order today!! Please feel free to contact me if you have any questions.
Happy Stampin'~ Erin

Tuesday, November 16, 2010

Ouch!!

For those of you who know already I am heading to Tuscon, AZ on Black Friday. My mother had surgery yesterday...here is the procedure she had done: an anterior cervical laminectomy with fusion. OUCH!! (I am not even sure I can pronounce it!!) She will be feeling much better by then (we all hope) but will still be needing some help with getting around (she can't even drive for 5-6 weeks!!). I will always remember my first visit out there..I am an east coast girl and perhaps always will be but WOW!! What a totally different environment and I honestly LOVED it!! My memory card on the camera was full of photos and some of the things I loved to photograph?? The quails!! I loved them...and when Stampin' Up! came out with this stamp set I knew I had to add it to my collection! Inside :
Card details: CS- Whisper White, Old Olive, Pumpkin Pie
Stamp Set- Happy Together (114314), Three Little Words (113254)
Accessories- Perfect Polka Dots embossing folder (117335), linen thread (104199), Brights Designer Buttons (119747), Big Shot (113439), Bigz XL die Tasteful Trim (120893)...LOVE IT~
Ink-Old Olive, Rich Razzleberry
So, just a quick post tonight and a cute & simple card for mom...just to let her know she's in our thoughts!! Happy Stampin' ~Erin

Monday, November 15, 2010

Great Deal on Starter Kit!

If you have been thinking about signing up to be a Stampin' Up! demonstrator...then the time to do so is now!! Click here to see a fabulous promotion that has NEVER been offered before!! Please feel free to contact me if you have questions or concerns about signing up. I would love for you to become part of something wonderful!! Happy Stampin'~Erin

Give Thanks..

Honestly the only thing I like about this time of year are the Holidays!! If you know me...you know I hate the cold, being cold, losing my tan (okay...that was a joke!) I never have a tan!!
But I love the Holidays!! Things seem to slow down a bit and you are able to spend time with family and friends. How amny of you only send those cards out...to long lost relatives but once a year?? Shame on you!! Just kidding...I'm guilty too!! This time of year is for giving thanks and counting your blessings and truly appreciating what you have.
Sure the decorations are fun...the fall colors are BEAUTIFUL and the food?? YUMMY!!! So whats not to love?? I can handle a few cooler/COLD days and spend them in the basement stamping!! This upcoming Friday I am hosting a Stamp Camp...hopefully in the basement~ it's currently under construction...we decided to re-paint the walls. It's a bit stinky down here so as long as it's completed and not overwhelming with toxic fumes we'll be down here, otherwise we will stamp upstairs in the kitchen or dining room..not to worry folks...I have it under control~wink wink!
Here is the first card we will be making: Lot's of goodies were used on this card. Stamp sets- Growing Green, En Francais and Elegant Thank-you (the inside). CS- very vanilla, sahara sand, garden green and Woodland Walk DSP. Ink- garden green craft spot, sahara sand. Access- vanilla taffeta ribbon, clear embossing powder, antique brads.
The second card: Loved this one~ thanks to www.splitcoaststampers.com I was totally inspired to make this beauty~ I LOVE this stamp set and if you look closely at the background it was made using just the inked clear block!! I know....genious right?? I just can't take the credit for it...it's a total CASE!!
Now I was hoping to show how to make a cute wooden 'tree' coaster as seen in this month's issue of Country Living Magazine and have ordered my BEAUTIFUL birch logs...it's just they are coming from Canada and not sure how long they will take to arrive. So if they are not here by Friday...that will be available at another Stamp Camp. I think it will make a great gift!! But not to worry, in it's place you will make another cute little 3-D treat!!
So if you are in the area, come on by!! Contact me if you have any questions!! Happy Stampin'~Erin

Sunday, November 14, 2010

I did it!!

So yesterday I attended my downline's Holiday Open House...she did a great job and had different stations set up for cards, walnut pumpkins, fabric...and more!! Anne...you are the best and did a FABULOUS job!
So..as a Stampin' Up! demonstrator we get a nifty little magazine called Stampin' Success and it's filled with tons of ideas and techniques (new ones EVERY month!!). For the month of November I knew immediately that I wanted to re-create a shirt that they had made using the Big Shot and the Flower Folds die (115970) (my absolute favorite!!) The key is to have a material that is 95% cotton/ 5% spandex so when it's cut the fabric starts to curl. You sew on your flowers and ta-da!!
She also loved the embellished shirt and made one like the day after seeing it in Stampin' Success..then when she showed me?? I BEGGED her to show me how...paper is my friend (not so much fabric...but I'm learning!!) I have two other ones I am working on and will post those when finished. Here is a close up of the frillies!!

Cute huh?? Now one thing I CAN do with our new fabric (since it doesn't require any sewing) is make cute little rings~ I made a ring for her as a 'thank-you' and also one for her newest recruit Jean!! I hope to get a video together on how easy these are...great for the holidays. The cute little box was made using the Big Shot and the Matchbox die (114890). Jazzed it up a bit with the coordinating Deck the Halls DSP (120810), Victoria crochet trim (118481), Vintage Trinkets (118764) and added a 'hand-made' tag with the Tiny Tags stamp set (118592 C) (118091 W) and jewelry tag punch (117190).
Sometime next week I should have the tutorial complete. In the meantime let me know if you have any questions!! Thanks and Happy Stampin'~Erin

Friday, November 12, 2010

Knock~Knock!!

Here is the another Christmas card (this was the third card from my Holiday Extravaganza Stamp-a-Stack). I was planning on posting this MUCH sooner...but had major computer failure!! When you call the professionals and they can't help and need to refund your $$..that's when you know that it't time for another computer!
Here is a close-up of the opened door, stamped with 'Holiday Greetings' from the Sincere Salutations (115068) stamp set. The ink and card stock are in Cherry Cobbler..which is so yummy!! This is a beautiful red~ perfect for the holidays!! The little ribbon was made with Real Red Taffeta, I tried using the re-inkers on the white taffeta ribbon but this was a close enough match and since we were making 4 of these cards..inky fingers and Whisper White card stock?? No bueno!! Hard to tell from the photo but I used the new embossing folder in the Holiday Mini catalog called Northern Flurry (120902). In my opinion, this folder is a MUST have~ order yours today!!
So now that things are running smoothly and no more computer issues you can be sure to expect some more cards and crafts to be shared in the near future!! This one was a favorite of mine...plan on making TONS for this Holiday Season. This was cased by Nance Lempinen-Leedy. Click here to see her blog and how the wreath was made, looks intimidating but it's SO easy and if I can do it, you can too!! Now...what was cute were the ladies here that night who loved the card but didn't realize that it was a door!! I know silly huh?? The wreath and door knob didn't give it away?? Beth..if you are reading this...sorry!! (wink wink).
Now speaking of door knobs...recently our neighbors and dearest friends celebrated their 30th wedding anniversary. I found this cute little wine bottle stopper that was made from a wrought iron door knob!! I swear there are TONS of such creative people out there! So along with their gift I made this card: Another super yummy red color?? Poppy Parade...how do they do it?? (Stampin' Up! packs SO much umph of color into their card stock and accessories...) I think my husband would kill me if I mentioned that I wanted to paint another room a Stampin' Up! color!! So this card was pretty much cased by Erica Cerwin...check out her blog if you ever need some inspiration..she just oozes talent and creativity! She mentioned on her blog that this card was originally inspired by Mary Fish (Stampin' Pretty). So how could I not love it?? I tweeked it just a bit and like the way it turned out...such a unique way to use the Curly Label Extra-Large punch (119851). Well...thanks for stoppin' in and I hope you leave inspired~see you next time!! -Erin
Posted by Picasa

Tuesday, October 26, 2010

Holiday Extravaganza Sneak Peak

This little cutie is one of the cards that we will be making at my next Stamp Camp~ It's a Holiday Extravaganza! We will be making a total of 12 cards w/envelopes. There will be a total of 3 different designs and make 4 of each of them. The first one uses one of my favorite stamp sets called Holiday Lineup (111648). I love the expressions on the reindeer~ doesn't it look like Rudolph accidentally passed gas or something?? Love it!! The eyes were filled in using the white gel pen (105021) which made it quick and easy...you could stamp these silly guys and color them in, but this is so simple to make especially if you need a bunch in a short amount of time. Added some glitter to his nose, ribbon and used the jumbo wheel Santa's Lineup (113120) for a quick background.
This next one doesn't use 'traditional' Christmas colors~ but I loved the vintage feel of it. This stamp set is called Good Cheer (115326). I stamped the image on vellum CS using Rich Razzleberry and layered it onto a piece of Early Espresso. The Very Vanilla piece was embossed using the Finial Press embossing folder (115963) and then I just grunged it up a wee bit by dragging the ink pad over it. Here is the inside of the card:
If you are in the area and would like to join, please contact me ASAP~ space is limited. Be sure to check my website for other upcoming events. Cost for this Stamp Camp is $20 (Club members pay 1/2!!) Remember to bring your catalog for a FREE stamp!!
It's hard to believe that the holidays will be here before you know it~ so get a start on those hliday cards!! Holiday Extravaganza attendees will be able to order all the stamps and accessories used, they will be offered at 10% off and I will pay to expedite the order!! Orders must be placed same day (Oct. 29th).
Please contact me if you have any questions!
Happy Stampin'
~Erin

Tuesday, October 19, 2010

Handmade Holidays Promotion!!

Are you as excited as I am for the holidays?? They are quickly approaching and Stampin' Up! has assembled some great packages for you. Click the flyer on the right for complete details!! Remember that the promotion runs: Oct. 19 - Dec. 16. Enjoy 20% off these select holiday products. Your friends, family members and neighbors would SO appreciate receiving a hand crafted gift and decorated package! Another great holiday idea is to give these packages as gifts themselves!! I also offer gift certificates in any amount. Please contact me if you have any questions, you can shop online 24/7 or contact me with your order and payment info.
Contact me to schedule a workshop or class, and I'll show you project ideas with some of the products!
Be sure to check my Stampin' Up! website and click 'calendar' to see upcoming events I have scheduled at my home and contact me today so I can share with you so many great ways to bring warmth to your family and friends at a workshop. Which project we make is entirely up to you~gifts, cards, candles, scrapbooks and so much more!!
Happy Stampin'~Erin

Monday, October 18, 2010

Rag Quilt Bag & Wine Tote

Well...hellooooooo!!! I can seriously not believe that I made this....BY MYSELF!!! Last year my husband bought me a sewing machine (I had wanted one for years) and he completely surprised me. I think my daughter had alot to do with my surprise since she has probably made more crafts than I have with a sewing machine!! Thank goodness to You Tube!
Over the next few weeks I will share with you some more fabric hand-made gifts that I have created and they are SO simple with the help of the Big Shot. I can't wait to use our new fabric.. from the Holiday Mini Catalog, my favorite is Deck the Halls (121716). I plan on making a fabric heart basket...perhaps I'll have to break out the video camera too!! I just hope that I remember how to edit and post...I have only made one video tutorial and that was over a year ago!!
Anyway... here are close-up pictures:
I watched Chic-n-Scratch's (thanks Angie!) video on how to make a rag quilt bag. You have to check it out...she is practically holding your hand every step of the way...and since I am just a beginner..that is JUST what I need!! For these I just revised how many squares (Scallop Square Die 115950)to use to make these two sizes. I made both in about 3-4 hours, including the matching pin. The pin was made using my favorite die called Flower Folds (115970). There are so many different tutorials out there for these flowers but the one I like best is Dawn Griffith's . Here you can see the back, where I added a pin..but these are great because they can be added to hair-clips, clothes...and so much more.
Tomorrow I will show you another wine tote that I made using some other fabric. I think I need to order some more of our fabric and make some wine totes to give as gifts this holiday season with a set of matching cards...since our exclusive fabric has matching designer series paper!!!
Now here are some more projects using the Decor Elements that I mentioned in my previous post. The first is another wine bottle with purple lights...actually they look just like the color Rich Razzleberry when lit: This one uses the crow image from the set Spooky Things (120909 black).
Hard to see from the photo so here is another close-up:
The top of the bottle has a strip of Wicked Fun Specialty DSP (117400) then a tied bow of 1/2" lace trim (120988) called 'Raven' so I thought it was appropriate! The tag uses the new Extra-Large Decorative Label punch (120907), Medium Oval punch (120908), Brights buttons (119747), linen thread (104199), Basics Glimmer Brads (121003) and if you look closely you can see that I sprayed the black card stock with Platinum Shimmer Paint (116807) mixed with rubbing alcohol.
This shadow box frame measures 12x12 and I placed a sheet of the same DSP...I love these flocked bats!! I battery powered tea light fits perfectly and all I did to spook things up a but was add shredded Basic Black CS. Added the decor elements to the front and that's it!! I will add a picture in the top right hand corner of the kids all dressed up in costume before they head out to go 'trick-or-treating'. I took another picture without the flash...so you can see the way the flame looks...so cool in person!!
Until next time...
~Erin

Thursday, October 14, 2010

More 'Spooky' Goodies to share...

Hello again....here are some more Halloween goodies I had displayed at my last Stamp Camp. Halloween is my favorite holiday, I love to decorate and over the years I have quite the collection of goblins and ghouls...my favorite pieces are these witch legs that stick out under a table...as if the witch has been smushed and this past year I bought an adorable little grungy witch head...that nobody else in the family likes..I'll have to post a picture of that too. But an inexpensive way to decorate your home is with Stampin' Up!
Anyway, on to the luminaries. These were so easy to make: Using the Big Shot and the Fancy Favor die (115965) with Pumpkin Pie CS, before I assembled the box I used our new 2 1/2" circle punch (120906) and stamped the image from the House of Haunts stamp set with black Staz-On ink onto vellum. Place a flameless candle and that's it!! Here is a close up picture:
I think the hardest part about decorating is deciding when to do it!! This year I waited until Sept. 15 (which I know is early) but look at the retail stores...you have Halloween on one side of the aisle and the other is Christmas...in AUGUST!!
Now for the next project I used our Decor Elements...OMG..don't you just love them?? Let me know if you have any questions at all about them, so easy to apply on almost any smooth surface. Here I used them on glass:
I found this jar at Target and knew immediatly what I was going to use it for...hard to tell from the photo but there are spiders all around it from the Decor Elements Spooky Things (120909 black). I tied some black raffia around the top and added
a tag:

The tag has our new glass glitter (aslo in the Holiday Mini) pg. 21...and I just read that it will tarnish...can't wait to see what it looks like all aged!!

Here is another project using the Decor Elements Spooky Expressions (117568) these little faces I could stick all over the house...how funny would one look on the toilet seat lid?? I used a large clear wine bottle (which I enjoyed emptying...LOL) cleaned out and fillled with a strand of 20 count orange lights. Added some olive raffia and a tag. Tried to get a better picture to see the face..it is SO cute in person!!

If you need to see any of the catalogs and check out all the goodies offered inside so you can create your own Halloween Decorations...click the links on the right!! Let me know if you have any questions!! Take care and tomorrow I'll post some more ideas!!

-Erin

Blogging tips