Hey there!! Enjoying the fall crisp weather? The past few mornings have been pretty chilly here in Virginia....I have been repeating over and over in my head "I will not turn on the heat, I will NOT turn on the heat". (Does a space heater count?) I think I'm ready for it..Fall that is. I mean...the summer did indeed FLY by but I am ready to embrace the change and this....

Time to head to Starbucks!! Mmmmmm!!!
I have been running again and on Monday made it 7 miles!! It felt great and when the temps are cooler it is MUCH more enjoyable!!
I need to share with you the cards we made at my last Stamp Camp!!
This first one was tough...I started one thing...then changed the entire design...until finally I walked completely away...poured a glass of wine (sometimes that's JUST what you need!) and distracted myself with a few games of Candy Crush (YES...I am an addict!) Have you played??
WARNING: It's highly addictive!! Don't even try it if you haven't already (you're welcome!!).
Anyway...here is the finished card and it uses a great Hostess set called Bloom with Hope (pg. 240)...I am SO glad I ordered it! The flowers are amazing...and don't have to be colored in (BONUS!)

Supplies
Stamp Set: Bloom with Hope (133949 W, 133952 C)
Card Stock: Crushed Curry, Very Vanilla and Typeset DSP (133704)
Ink: Crushed Curry, Early Espresso, Sahara Sand
Access: Very Vintage Designer Buttons (129327), Clear Embossing Powder (109130), Heat Tool (129053), Linen Thread (104199), Early Espresso Seam Binding Ribbon (134582), Big Shot (113439), Flower Frenzy Bigz L die (133728), Vanilla Shimmer Smooch Spritz (118772), Sticky Strip (104294), Stamping Sponges (101610)
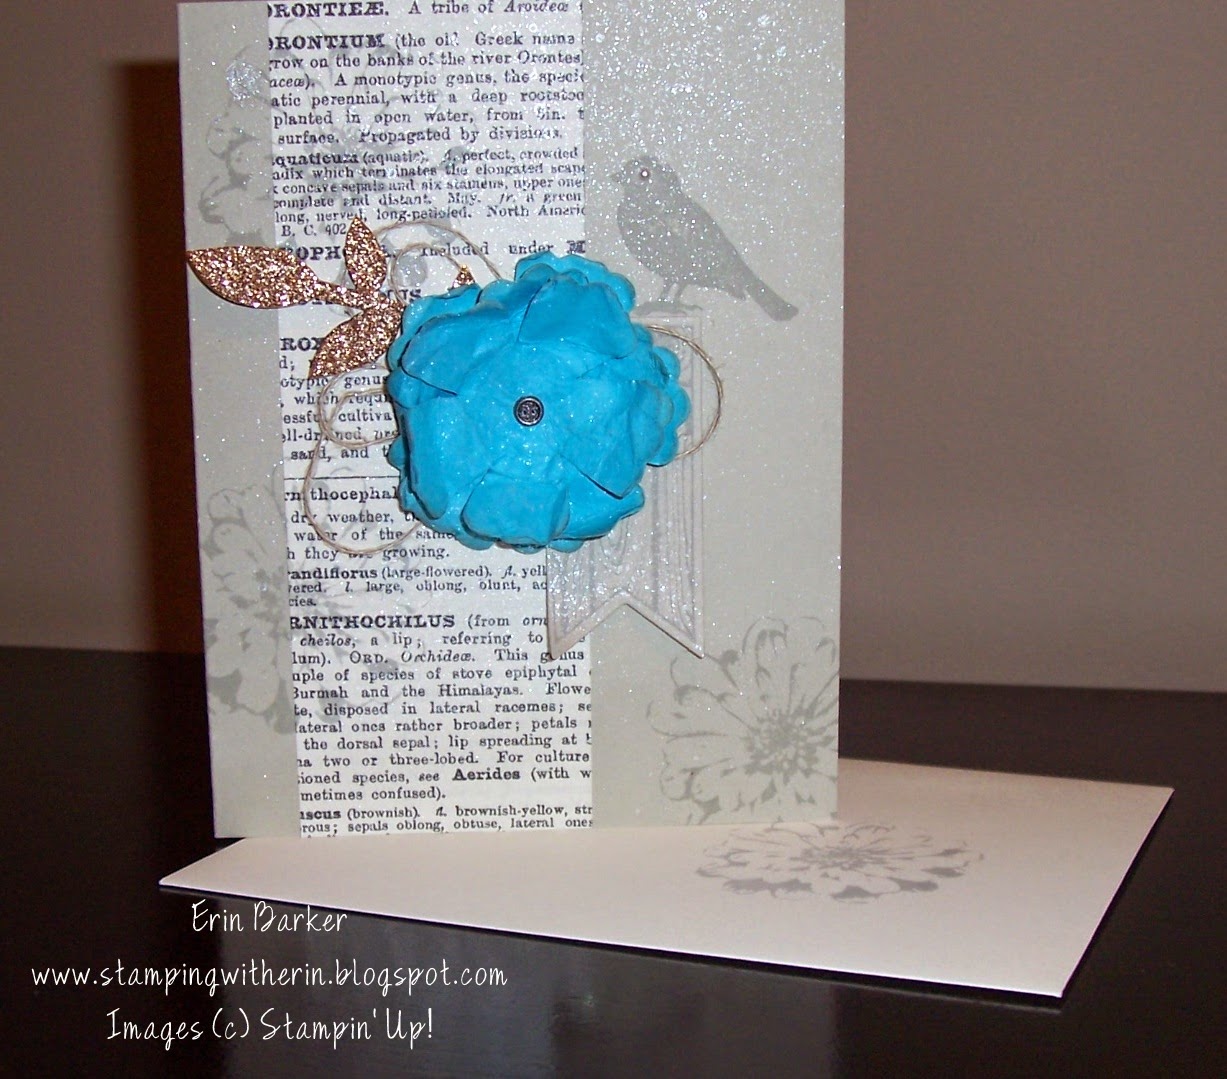
The next one came pretty easily to me (perhaps it was the wine flowing!) I have a really poopy camera~ my phone takes WAY better pics so be sure to follow me on Instagram (click tab on the right) for better pics of these beauties!! I did however like how the flash really pics up the shimmer...so purdy in real life!!

I have not used this beautiful butterfly in what seems like FOREVER and why?? I LOVE it!!
Supplies
Stamp Set: Million & One (126375 W, 126377 C), Swallowtail (131943 W, 129216 C)
Card Stock: Real Red, Very Vanilla and Typeset DSP (133704)
Ink: Basic Gray, Sahara Sand, Versamark
Access: Big Shot (113439), Fancy Fan Embossing Folder (127751), Vanilla Shimmer Smooch Spritz (118772), Stamping Sponges (101610), Heat Tool (129053), Stampin' Dimensionals (104430), Black Embossing Powder (109133), Elegant Butterfly Punch (127526), Rhinestone Basic Jewels (119246)
This Typeset DSP is great because it's thinner than our normal Designer Series Paper...so when stamping on both the CS and this at the same time, your image doesn't become too distorted because of that additional layer.
This card really makes a statement...bold red color...BIG (yet subtle image) and then the wording really POPS with the black embossing. LOOOVE it!!
Lastly...this one (which was inspired by the card shown in the catalog...look on pg. 127). I knew I wanted to use the stamp set World of Dreams...so I grabbed my catalog...and became inspired!!
Don't...I repeat DON'T throw out those old catalogs!! They aren't called 'Idea' Book & Catalogs for nothing!!

Supplies
Stamp Set: World of Dreams (134183 W, 134186 C)
Card Stock: Very Vanilla, Early Espresso, Night of Navy
Ink: Versamark, Early Espresso, Crumb Cake
Access: Venetian Crochet Trim (134581), Night of Navy Seam Binding Ribbon (134571), Big Shot (113439), Woodgrain Embossing Folder (127821), Ovals Collections Framelits (129381), Heat Tool (129053), Clear Embossing Powder (109130), Antique Brads (117273), Stampin' Dimensionals (104430), Vanilla Shimmer Smooch Spritz (118772)
Note: My little flower with the pearl in the center is from a retired punch...Shhhhh!! But the new Itty Bitty Accents Punch Pack (133787) $16.95 would be PERFECT and is on my next order!!
There are a few things that I used on EVERY card shown...and are my Go-To's
1.) Vanilla Shimmer Smooch Spritz (118772) $4.95 (Because well...face it~ everything is better in shimmer!
2.) Sponging!! Stamping Sponges (101610) $3.50 I love to make my cards look grungy and aged sometimes...well MOST times!! My fav colors to use for this are Crumb Cake and Sahara Sand
3.) Typeset DSP (133704) $12.95
Shop my online Store 24/7 by using the item #'s listed above if it's a goody that you too MUST have...make something special today!!

Creatively yours,
Erin
See you next time!!


.jpg)