First and foremost...today is a GREAT day!! I was able to register for Stampin' Up!'s Convention in Salt Lake City, Utah!!!! So...even though I am fighting a cold, limping with my bad leg...I am soaring on cloud 9!!
It is such a great time and this year I have some friends/downline demonstrators who are able to go too!! Time to start thinking of swaps!! In years past I have not made any...and always regret it. So this year I plan on starting early (like now) and not feel pressured when it's time to start packing!! Swaps are a great way to share ideas, inspiration and get ahold a variety of samples to showcase at Workshops and Stamp Camps. I will share with you what I create when I know what I'm making~ wish me luck!! My goal is to have a total of at least 150 swaps!!
Better get busy!!
It's pretty simple, first stamp your card base. Then hide the washer behind a layer of DSP (works better than CS because it's thinner). I adhered it directly to the DSP using double-sided tape. I layered another stamped piece of CS, but this step is optional. Then attach the magnet~ here I used a flat glass backed marble that I glued using Crystal Effects (101055) a magnet to. Again, here is the finished card.
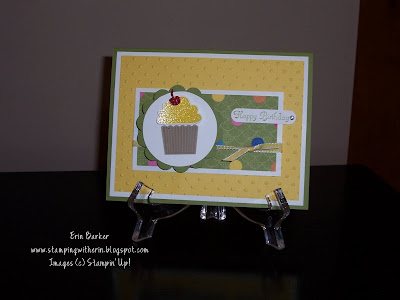
Now here is another card/example that uses the same concept. This card uses goodies that I earned FREE from the Sale-a-Bration promo. In addtion it uses one of the cutest stamp sets ever~ Create a Cupcake (121915 W, 121982 C). It looks so yummy in person, the top part of the cupcake (the frosting) was stamped first with Daffodil Delight classic ink then I quickly embossed with Iridescent Ice embossing powder (101930).
Remaining card details:
Card Stock: Old Olive, Whisper White, Daffodil Delight, Red Glimmer Paper (121790), Ice Cream Parlor(122242) DSP from Sale-a-Bration
Ink: Old Olive, Crumb Cake, Daffodil Delight
Accessories: Build a Cupcake Punch (121807), Basic Rhinestones (119246), Daffodil Delight 1/8" taffeta ribbon (119254), Perfect Polka Dots Embossing Folder (117335), Word Window Punch (119857), 2 3/8" scallop circle extra-large punch (118874), 2 1/2" circle punch (120906)
Here is how I assembled this one:
Left photo shows the cupcake that is the removeable magnet. The right picture shows where I taped the washer...now that you know how easy it is to make, try it for yourself!!
Hope you all have a fabulous day!!
Stampin' Hugs~ Erin


No comments:
Post a Comment