Showing posts with label Designer Rosette die. Show all posts

Monday, April 8, 2013

Spring really did 'SPRING'!!

You know that saying "Ask and you shall receive"? Well...you all know that I have been asking~ AND asking....for a LONG time and FINALLY!! This past weekend was beautiful and even though I was a wee bit under the weather...I really think it's just allergies. You just had to get out there to enjoy it!! Yesterday we did some work in the yard....until I thought my head was going to fly off from all my sneezing!! I shot this quick pic of the kids playing with the hose after a bike ride...they said they were hot and wanted to go in the sprinkler...are they crazy?? (Mine are the two on the right, Regan and Aiden)

Don't worry...I was a good mommy and said "no". Do allergies bother you?? A few years ago I suffered a little bit...not even enough to take anything for it. But not now...I am loving my Zyrtec. I suppose it's just another little love of aging....Ugh!

Last Friday I noticed that along our back fence the forsythia was beginning to bloom. I read in this month's Better Homes and Gardens 'Country Gardens' (Spring March 2013 Vol. 22, no.2) that you can force bloom by bringing blooming branches inside. It's a great article with lots of pictures for inspiration.Well...I was not that adventurous~ I bought some of the fake stuff. Don't judge me~ I have a serious BLACK thumb (maybe it's from Staz-On ink).
So since I love the bright 'yellow' so cheerful and bright...I bought forsythia.
Here is above our kitchen cabinets:

In the bathroom:


Family room:

and aren't these nests the cutest???


I think that even the fake stuff is making me sneeze~ perhaps I need to dust!!


So...now you know I had to incorporate some 'spring' Stampin' Up! style~


Here is a banner that I made...hard to tell from the pictures because the glitter is so shiny and pretty and elegant and sparkly and pretty...and well~ you get the idea!! (I love it!!)


Close-up:


I kept it fairly simple because all you need to see are the pretty sparkly letters!! I cut the banner using the Perfect Pennants Bigz L die(123126) and Soft Suede CS. Then I applied some Gesso on the edges to give it a white-washed look. Using the same die, I used the smaller pennant and the Tea for Two DSP (129311). For the letters I attached a piece of our Multipurpose Adhesive Sheets (120805) to some Very Vanilla CS and cut the letters out using the Typeset Alphabet Bigz die (127553). Once they were cut out, peel off the protective film and press down into the glitter. Here I used the Champagne Glass glitter (120997). This is honestly the first time I used our Adhesive Sheets....shame on me!! They are awesome!! I didn't stop there...check this beauty out~


Isn't she pretty?? I used the Elegant Bird Bigz die (125593). I attached the wing to body with the antique brad and hot glued it to the wreath. The flowers were made using our Tea for Two Designer Fabric (129308). Click here for a link to a video that I made a few years ago on how to create the flowers. Very easy....so I made and extra one and stuck it to my lantern!


Next in the kitchen and speaking of easy....I added some of the same DSP to some battery lit candles and tied a strip of the fabric around one of them.

Lastly I have some lollies...or medallions to share. I love the colors of this paper...it didn't really make me want any tea (Remember it's called Tea for Two). Just a glass of wine~ or two to enjoy as I glance around my home and smile!!
These were both created using the Designer Rosette Bigz XL die (125594) for the larger one I cut the DSP down to 4" x 12" and it used 3 strips. The smaller Gumball Green one was made using (3) 3" x 11" pieces and trimming as needed from the score lines on the die. Decorated the fronts and attached them to a dowel...that I stained using a Stampin' sponge and Soft Suede ink. Found the glass marbles at a local craft store and voila!

Here are close-ups:

Hope it is warming up where you are...and if not~ make some 'spring' creations to make you smile!! Please let me know if you have any questions, or leave  me a comment and let me know what you think! Thanks!!

BIG stampin' hugs,
Erin

Shop Online 24/7 (even in your P.J.'s)
website: www.erinsstampart.stampinup.net
email: stampingwitherin@yahoo.com

Tuesday, September 11, 2012

Rosette and witch boot tutorial

Still on a Halloween kick~ I must say that the majority of the house is decorated...finished it up while watching football...GREAT victory for our local Washington Redskins and YAY for my New England Patriots!! I would still like to decorate the outside but (it's a wee bit early!) My neighbors already think I'm nuts! So a few 'faux' pumpkins in the porch are okay.

The other day I pulled out the Designer Rosette Bigz XL die (125594). Confession: I bought it as soon as it was available with excitement...and until the other day I had not even used it!! Whatever was I thinking?? I watched Stampin' Up!'s great video/tutorial and went to work...my hubby laughed at my sillyness because mid-completion...they really do start looking like a lampshade (which I placed on my head like a hat!) Watch the video and you'll see what I'm talking about:


After I took off my head and completed it:


Isn't it AMAZING?? He was even impressed ! I used a total of (3) 12" pieces for all of the large rosettes. Measurements vary depending how wide you want them.

Here are a few more:
Here is a close-up and this big ol' one is like a dinner plate!


Now as promised, here is a quick photo tutorial on how I made the smaller scallop rosette as shown on the left. Also shown here on my 'spooky' tree.

1. Punch two 2 3/8" scallop circles (118874) with your choice of DSP (CS doesn't work, too thick)

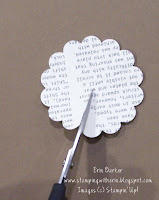
2. Score end-to-end in between every scallop (do this to both)

3. Using paper snips, cut on the score line to the center (do this to both)

4. Fan fold (mountain/valley) each score line (do this to both, but be sure to start your fold opposite the first one)

5. Adhere the two scallops as shown (I prefer to use to Tombo 110755)

6. Hot glue gun time (yay!) punch out a smaller circle I used a 1 1/4" circle punch (119861) and adhere to the back, then decorate as desired.

Voila~

Now...details on this 'boot'iful witch boot, here is a close-up:
My husband and I joined a bowling league this year and our team name is 'Gutterfingers' and since we are in last place...you get the idea as to why we named ourselves it.

So..inside are Butterfingers...I should punch out the letter 'G' and cover the 'B'

This witch boot was made with the Bog Shot and the Holiday Stocking Bigz L die (124098). I watched Tami White's tutorial here on how to make the boot. Enjoy and let me know what you think!

Take care and have a great day!!
Stampin' hugs,
Erin

Shop Online 24/7 (even in your P.J.'s)
www.erinsstampart.stampinup.net
stampingwitherin@yahoo.com


Blogging tips