Wednesday, September 12, 2012

Burlap Banner Tutorial

Okay...are you ready? As promised:
Here is a quick video tutorial on how I made my burlap banners in this post.


This is what I did with it:


I have loads of these fun abandoned windows in my shed...waiting for new life~thanks to the hubby for being in construction! I added an expired Decor Element crow at the bottom...I wish Stampin' Up! still sold vinyl :(

Please let me know if you have any questions!! See you tomorrow!
-Erin
Shop online 24/7 (even in your P.J.'s)
www.erinsstampart.stampinup.net

Tuesday, September 11, 2012

9-11-01 Never Forget, CC392 Color Challange


I know what you are thinking...'WOW' two posts in one day?? Actually I meant for earlier's post to have been yesterday's post...but forgot to click the 'publish' button!! Came down this morning to sit at the computer and low and behold...it was still there staring back at me!! Oops!!

Anyway...on to officially today's post. Today is 9/11 a day that none of us can forget. I was pregnant with Aiden watching PBS (which didn't break for any news/special reports) with my daughter Regan. My husband had called and told me to turn to the news, at that time only the first plane had crashed...sadly you know the rest. My heart goes out to all of the families affected by this tradgedy and for all of the lives lost. I am also grateful for the brave men and women who gave their lives on this day 11 years ago... and who continue to serve this amazing country. Thank-you~ 9-11-01 'Never Forget'.

 In early August I went on vacation with my two youngest (Regan and Aiden) to NYC. I could not believe it was my first time! We had a great time and took in all of what this wonderful city had to offer (Spiderman on Broadway, The Empire State Building, Central Park, The Statue of Liberty, Times Square and yes...even The Naked Cowboy!).

Here are Regan and Aiden at the 9-11 Memorial which honors the 2,983 men, women and children who perished in the terrorist attacks on September 11, 2001 and February 26, 1993.

I look forward to going back and think that during the cooler months it would be beautiful to take a nice autumn stroll through Central Park, or maybe in February (my B-Day month) asking my hubby to take me ice-skating at Rockefeller Plaza. We'll see~

Guess what??? I did something for the first time today...participated in a Color Challange posted on www.splitcoaststampers.com. There is a new 'Color Challenge' posted every Tuesday and now I can't wait until next week!! This week's challenge was to use the colors; Pumpkin Pie, Cajun Craze and Midnight Muse and create a 'Fall'/Thanksgiving themed card. It's called CC392 Crazy Midnight Pumpkin. Check it out and play along...or check back next Tuesday for more inspiration!
Here is my card:


Inside:

Supplies:
Stamp Set: Gently Falling (123804 C), Pursuit of Happiness (121970 C), Elements of Style (120045 C)
Card Stock: Pumpkin Pie, Cajun Craze, Midnight Muse, Very Vanilla, First Edition Specialty DSP
Ink: bleach (for the background leaves) Midnight Muse, Versamark
Access: heat tool, pewter embossing powder, linen thread, dimensionals, 1 1/4" circle punch, 1 3/8" circle punch, dotted scallop ribbon border punch, champagne mist shimmer paint (mixed with rubbing alcohol)

I knew it needed something...so I ventured outside and found 'a stick' and attached it with linen thread. The 'For You' sentiment has two layers of dimensionals to give it a wee bit more height. When it was done...it needed shimmer~ (everything does!!) I liked it~ so I decided then to make a gift:
Here is a close-up of the candle...click here for a tutorial on how to stamp on candles..it's fun and it has been awhile since I made one.

Tomorrow I will be posting my video tutorial on how I made my burlap banners...check back then!!

Take care,
Erin
Shop online 24/7 (even in your P.J.'s)
www.erinsstampart.stampinup..net
stampingwitherin@yahoo.com
 

Rosette and witch boot tutorial

Still on a Halloween kick~ I must say that the majority of the house is decorated...finished it up while watching football...GREAT victory for our local Washington Redskins and YAY for my New England Patriots!! I would still like to decorate the outside but (it's a wee bit early!) My neighbors already think I'm nuts! So a few 'faux' pumpkins in the porch are okay.

The other day I pulled out the Designer Rosette Bigz XL die (125594). Confession: I bought it as soon as it was available with excitement...and until the other day I had not even used it!! Whatever was I thinking?? I watched Stampin' Up!'s great video/tutorial and went to work...my hubby laughed at my sillyness because mid-completion...they really do start looking like a lampshade (which I placed on my head like a hat!) Watch the video and you'll see what I'm talking about:


After I took off my head and completed it:


Isn't it AMAZING?? He was even impressed ! I used a total of (3) 12" pieces for all of the large rosettes. Measurements vary depending how wide you want them.

Here are a few more:
Here is a close-up and this big ol' one is like a dinner plate!


Now as promised, here is a quick photo tutorial on how I made the smaller scallop rosette as shown on the left. Also shown here on my 'spooky' tree.

1. Punch two 2 3/8" scallop circles (118874) with your choice of DSP (CS doesn't work, too thick)

2. Score end-to-end in between every scallop (do this to both)

3. Using paper snips, cut on the score line to the center (do this to both)

4. Fan fold (mountain/valley) each score line (do this to both, but be sure to start your fold opposite the first one)

5. Adhere the two scallops as shown (I prefer to use to Tombo 110755)

6. Hot glue gun time (yay!) punch out a smaller circle I used a 1 1/4" circle punch (119861) and adhere to the back, then decorate as desired.

Voila~

Now...details on this 'boot'iful witch boot, here is a close-up:
My husband and I joined a bowling league this year and our team name is 'Gutterfingers' and since we are in last place...you get the idea as to why we named ourselves it.

So..inside are Butterfingers...I should punch out the letter 'G' and cover the 'B'

This witch boot was made with the Bog Shot and the Holiday Stocking Bigz L die (124098). I watched Tami White's tutorial here on how to make the boot. Enjoy and let me know what you think!

Take care and have a great day!!
Stampin' hugs,
Erin

Shop Online 24/7 (even in your P.J.'s)
www.erinsstampart.stampinup.net
stampingwitherin@yahoo.com


Sunday, September 9, 2012

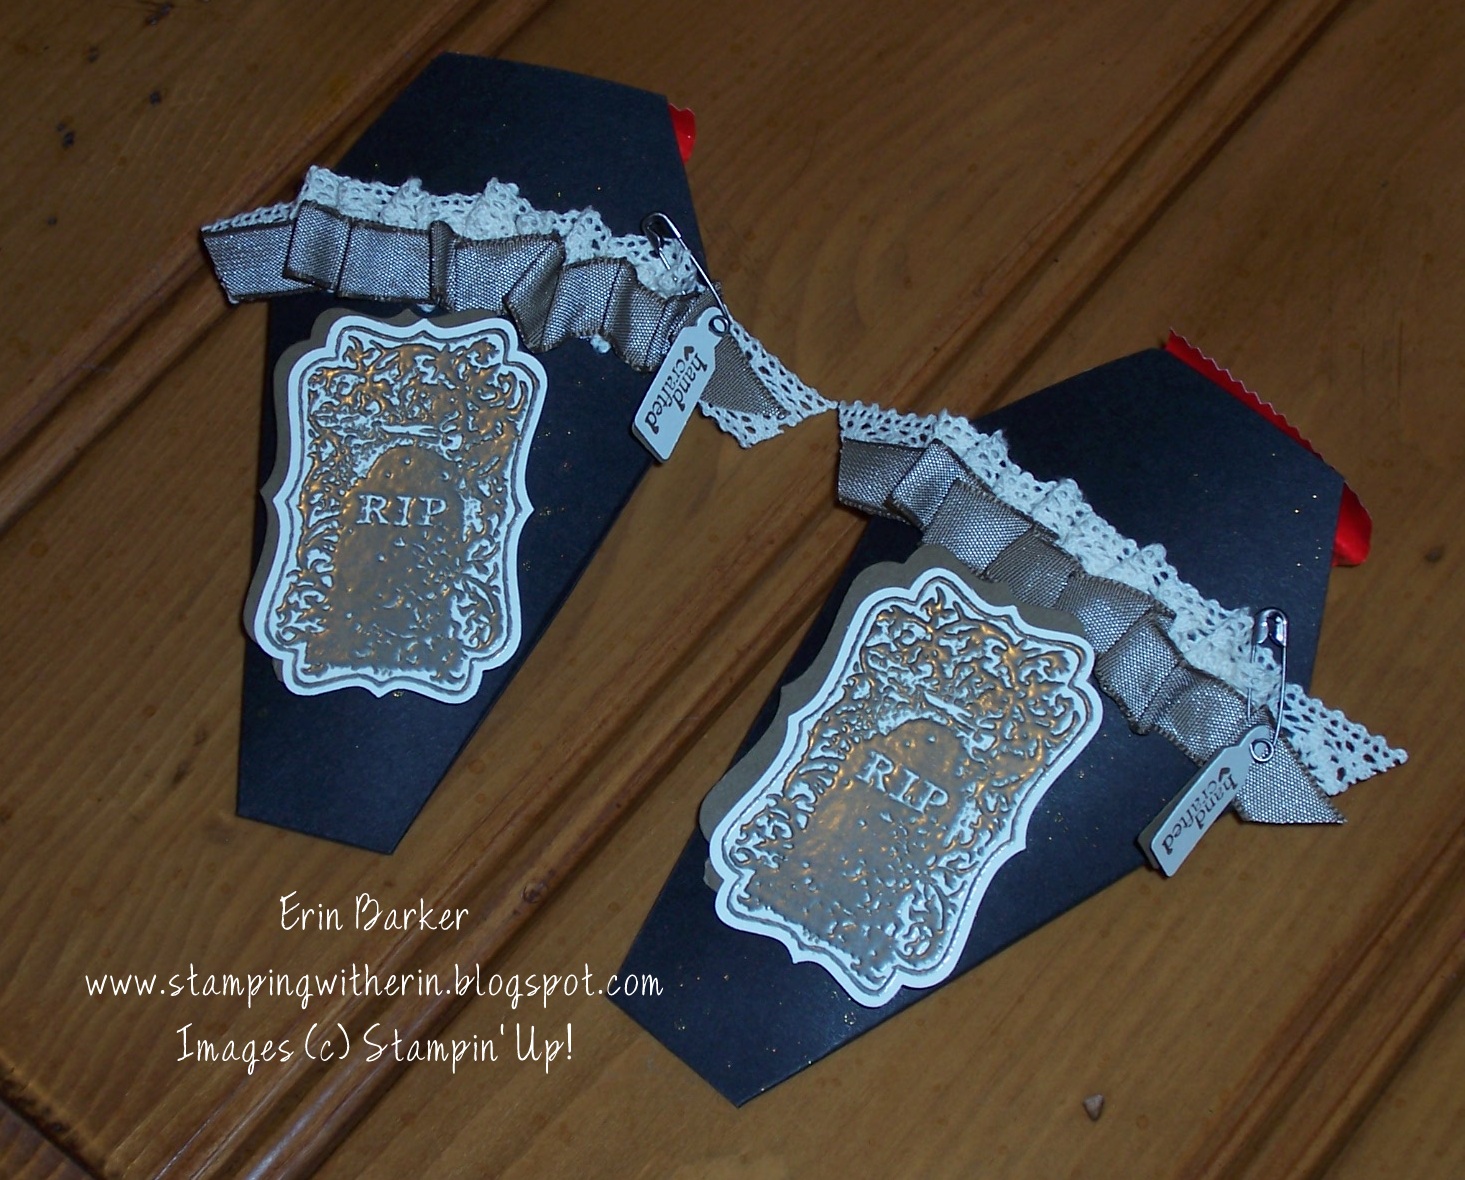
Prettiest 'coffin' ever!!


This might be the prettiest coffin I have ever seen~ LOL! It doesn't look 'spooky' at all!! Very appropriate that I used the RIP image from the Toxic Treats stamp set.  Aren't they cute??

Not sure how well you can see in the photo the shimmer...but before it was embellished I spritzed the Basic Black CS with the Log Cabin (just like dirt...get it??). I have had SO much fun over the last several days making Halloween goodies. These were inspired/CASED from Selene Kempton who presented them at the Providence, RI Stampin' Up! Regional event. This Petal Cone die can be used for lots of ideas...a MUST have in my opinion. Examples: carrot, chinese take-out box, ice cream cone, the ever so cute 'coffin' and more!! Order yours today!!

Last Friday night I hosted a Stamp Camp and the customers who brought a new stamping friend received this favor as a special treat from me. Aiden (my youngest) has asked if this is what I can make for his classmates for Halloween...he has about 19 kids in his class and this is the perfect treat. Thanks Mr. 'Big Shot' for making this momma's life easy! During Stamp Camp my friend Sherri heard me say "Easy Peasy" (which I say alot) 'Easy Peasy Lemon Squeasy' or is it SQUEEZY? . Well...this project is just that! Check out her tutorial and try for yourself!!

Supplies:
Stamp Set: Toxic Treats (127898 C) Tiny Tags (118592 C)
Card Stock: Very Vanilla, Basic Black, Soft Suede
Ink: Versamark pad (102283)
Access: Log Cabin Smooch Spritz, Soft Suede taffeta ribbon, vintage trinkets, crochette trim, pewter embossing powder, heat tool, punch, sticky strip, decorative label punch, dimensionals, jewelry tag punch


Here is one of the cards that they made using the same stamp set Toxic Treats.


How is opens:
Notice how I added additional bubbles with our basic pearls??

Supplies:
Stamp Set: Toxic Treats
Card Stock: Sahara Sand, Very Vanilla, Tangerine Tango
Ink: Tangerine Tango, Versamark pad, Crumb Cake
Access: pewter embossing powder, heat tool, framelits labels collection, Big Shot, stamping sponges, basic pearls, Big Shot, Vintage Wallpaper embossing folder,

Cute huh? Click here to see how to use 1/2 of the framelit in the big shot to create the 'swing'.
Now...check this out:


Sneak peak: They also made this burlap banner...which I am in the process of filming a video tutorial for...stay tuned!

Here is a close-up. I asked my hubby to make me a fence for above our cabinets and he spray painted it black. Seriously....I LOVE that man...he whipped it up in like 10 minutes!!
Here is the other 'Spooky' side:
Now one more thing to share with you...my latest Halloween decor item...meet 'The Old Hag'..isn't she AMAZING?? She is holding a glowing battery operated tealight candle...I just HAD to have her!!

I can't wait until later today...while football is on~ I will be decorating!!!!!!! All of my boxes/bins have been brought down from the attic. YAY!!!
Then we bowl tonight...another YAY!!!

Contact me if you have any questions!!
Stampin' hugs,
Erin
Shop online 24/7 (even in your P.J.'s)
email: stampingwitherin@yahoo.com

Tuesday, September 4, 2012

Papaya Collage Sampler

Today I am working on some more Halloween projects, but I wanted to share with you some cards that I made last week using my latest favorite stamp set called Papaya Collage (126612 C).

I think that from now on when I ink up a some new rubber I am going to create a 'sampler' that showcases different ideas on how to use the images in the set. I am really stuck on making 4 cards that can also be grouped together nicely as a gift.

Here is what I mean:


This was the first card I made...and it made me smile! It's not normally my style..the 'shabby' vintage feel..but once I started I couldn't stop! Here is a close-up of the bird..I actually cut it out by myself...and didn't cut off any of his toes!! I embossed the hat with clear embossing powder (I cut that out too!!)and added a pearl for his eye.
Inside view:


Here is the second card I made:
On this card and the next, I used the Elegant Butterfly punch (127526) and added some pearls (119247).
Inside:


Third:
All of them were spritzed with the shimmer mist (you can really see it here). But what is neat, when you spray vellum it curls! So this butterfly looks like it's really ready to 'take-off'!
Inside:


Last but not least:
and here is the inside of this one:


As I  have mentioned in previous posts...I LOVE the Champagne Mist shimmer paint. I wonder if I sprayed it on myself...if it would make 'me' feel pretty!! (Just kidding!!)
Additional supplies used:
Vellum Card stock (101856), Basic Pearls (119247), Very Vanilla Seam Binding ribbon (120999), Curly Cute stamp set (120510 C), stamping sponges (101610), 2-Way Glue pen (100425), Champagne Stampin' Glitter Glass (120997)

Just let me know if you have any questions, or leave me a comment and let me know what you think! Which one is your favorite??
Stampin' hugs,
Erin

Shop online 24/7 (even in your P.J's)
www.erinsstampart.stampinup.net

Monday, September 3, 2012

Bring on the Fall season & 'Gratitude'

Happy Labor Day!! Today is bittersweet, as it means the end of summer...but the beginning of football!! I am not a HUGE football fanatic but I am from New England~ favor the Patriots and Tom Brady is my secret boyfriend (shhhhh!). What I do get excited about when Fall arrives...are the holidays, the warm colors the season brings and you must not leave out the FOOD!!

This upcoming Friday I am hosting a Stamp Camp here at my home and I will be teaching a 'honeycomb' technique using the Full Heart punch (119883) that I saw over on Lydia's blog www.understandblue.blogspot.com click here for her tutorial. Here is the card that we will be making:
Notice...the leaf?? Oopsy~ I noticed that when I uploaded my photo the text was upside down...who cares!! I will be making another one of these to go along with a teacher gift for my son's teacher...you can never have enough hand sanitizer...an apple a day keeps the doctor away!
(Found at Bath & BodyWorks)


Supplies:
Stamps: Fabulous Phrases
Card Stock: Very Vanilla, Early Espresso, Cherry Cobbler
Ink: Early Espresso, Lucky Limeade, Cherry Cobbler
Access: Full Heart Punch (119883), Bird Builder punch (117191), First Edition DSP (121878), stamping sponges (101610), Vintage Trinkets (118764)

I loved this technique so much that I thought the heart could also make a cute pumpkin?? I tried and didn't like it...off in the garbage it went. Then I asked the hubby his opinion and voila~
 
Here I used the Extra-Large Oval punch (119859)..same leaf and stem from the Bird Builder..AND I placed the leaf correctly (yay!). This one was sponged with Pumpkin Pie ink (duh!)
I added some newbies for this one, the textured background on the Old Olive CS is the new embossing folder Lacy Brocade (127819) LOVE it!! It is found on pg.6 in the Holiday Mini catty. I also used the fun Scallop Tulle ribbon in Crumb Cake (127840)...this I am ORDERING LOADS of...I can't express how many uses I have for all three colors of ribbon (pg.4). I just wrapped it around the Very Vanilla CS and tied with linen thread. Added a tag stamped with Old Olive and an image from Tiny Tags (118592 C).  I punched it out along with an Early Espresso CS piece with the Small Oval punch (120908). It's attached with a safety pin from the Vintage Trinkets (118764). Roughed up the edges a bit...sponged them a teeny bit...then added the shimmer (everything looks better with shimmer!!).
Here is the inside:
See what I mean?? It's so elegant in real life...the flash on the camera picked up the shimmer quite a bit. This sentiment is from Day of Gratitude (121148).

That's it for now...making other goodies, dinner then getting the kids ready for bed...off to school again tomorrow. It's weird that they went back for such a short week lastweek. They get another short one this week...I suppose it's nice to break em' in easy! No homework yet...!
Stampin' hugs,
Erin
Shop online 24/7 (even in your P.J.'s)
www.erinsstampart.stampinup.net


Saturday, September 1, 2012

Stampin' Up! is going 'Back to Spool'!

September 1st, 2012~ school began here in Frederick County Va. last Wednesday. But now it's 'Back to Spool' time...check out this great Stampin' Up! video:
Okay...maybe you wouldn't go that far as to decorate a kitchen applience...but earn your FREE spool of 3/8" stitched satin ribbon ($8.95 value) for every $40 spent. Click here for promotional details.
Remember: Applies during the entire month of September!

Shop online 24/7 at www.erinsstampart.stampinup.net
Blogging tips