Showing posts with label Toxic Treats. Show all posts

Tuesday, September 11, 2012

Rosette and witch boot tutorial

Still on a Halloween kick~ I must say that the majority of the house is decorated...finished it up while watching football...GREAT victory for our local Washington Redskins and YAY for my New England Patriots!! I would still like to decorate the outside but (it's a wee bit early!) My neighbors already think I'm nuts! So a few 'faux' pumpkins in the porch are okay.

The other day I pulled out the Designer Rosette Bigz XL die (125594). Confession: I bought it as soon as it was available with excitement...and until the other day I had not even used it!! Whatever was I thinking?? I watched Stampin' Up!'s great video/tutorial and went to work...my hubby laughed at my sillyness because mid-completion...they really do start looking like a lampshade (which I placed on my head like a hat!) Watch the video and you'll see what I'm talking about:


After I took off my head and completed it:


Isn't it AMAZING?? He was even impressed ! I used a total of (3) 12" pieces for all of the large rosettes. Measurements vary depending how wide you want them.

Here are a few more:
Here is a close-up and this big ol' one is like a dinner plate!


Now as promised, here is a quick photo tutorial on how I made the smaller scallop rosette as shown on the left. Also shown here on my 'spooky' tree.

1. Punch two 2 3/8" scallop circles (118874) with your choice of DSP (CS doesn't work, too thick)

2. Score end-to-end in between every scallop (do this to both)

3. Using paper snips, cut on the score line to the center (do this to both)

4. Fan fold (mountain/valley) each score line (do this to both, but be sure to start your fold opposite the first one)

5. Adhere the two scallops as shown (I prefer to use to Tombo 110755)

6. Hot glue gun time (yay!) punch out a smaller circle I used a 1 1/4" circle punch (119861) and adhere to the back, then decorate as desired.

Voila~

Now...details on this 'boot'iful witch boot, here is a close-up:
My husband and I joined a bowling league this year and our team name is 'Gutterfingers' and since we are in last place...you get the idea as to why we named ourselves it.

So..inside are Butterfingers...I should punch out the letter 'G' and cover the 'B'

This witch boot was made with the Bog Shot and the Holiday Stocking Bigz L die (124098). I watched Tami White's tutorial here on how to make the boot. Enjoy and let me know what you think!

Take care and have a great day!!
Stampin' hugs,
Erin

Shop Online 24/7 (even in your P.J.'s)
www.erinsstampart.stampinup.net
stampingwitherin@yahoo.com


Sunday, September 9, 2012

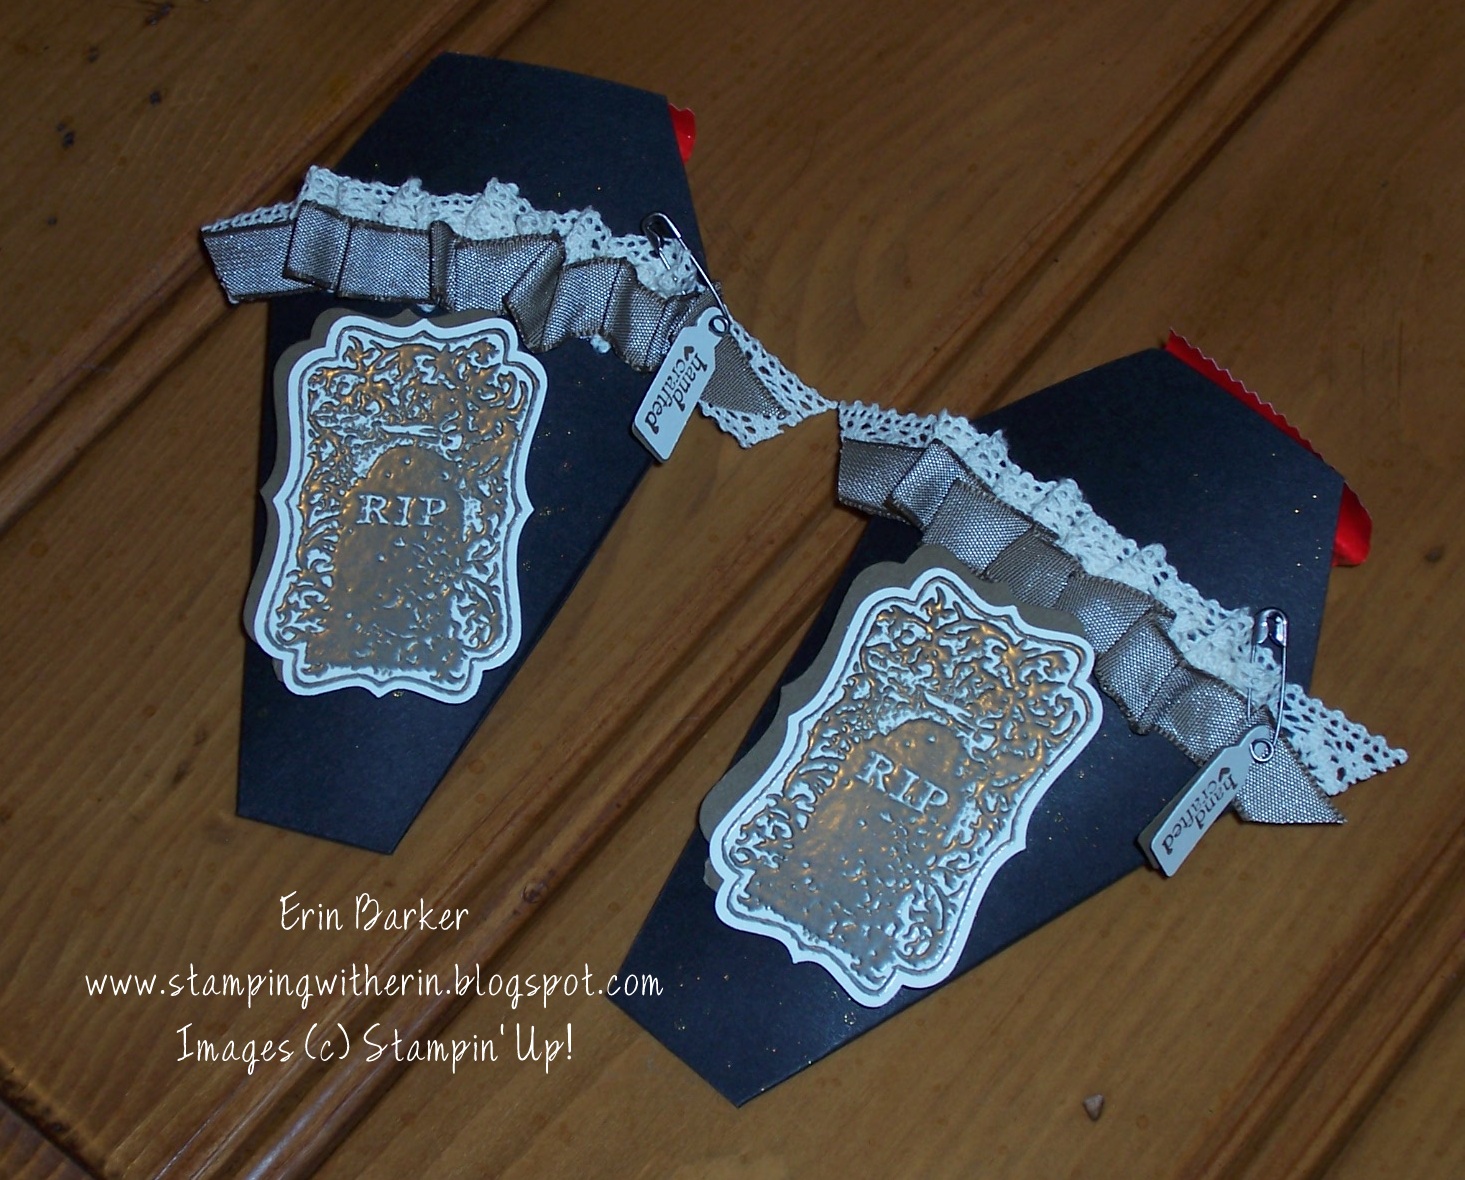
Prettiest 'coffin' ever!!


This might be the prettiest coffin I have ever seen~ LOL! It doesn't look 'spooky' at all!! Very appropriate that I used the RIP image from the Toxic Treats stamp set.  Aren't they cute??

Not sure how well you can see in the photo the shimmer...but before it was embellished I spritzed the Basic Black CS with the Log Cabin (just like dirt...get it??). I have had SO much fun over the last several days making Halloween goodies. These were inspired/CASED from Selene Kempton who presented them at the Providence, RI Stampin' Up! Regional event. This Petal Cone die can be used for lots of ideas...a MUST have in my opinion. Examples: carrot, chinese take-out box, ice cream cone, the ever so cute 'coffin' and more!! Order yours today!!

Last Friday night I hosted a Stamp Camp and the customers who brought a new stamping friend received this favor as a special treat from me. Aiden (my youngest) has asked if this is what I can make for his classmates for Halloween...he has about 19 kids in his class and this is the perfect treat. Thanks Mr. 'Big Shot' for making this momma's life easy! During Stamp Camp my friend Sherri heard me say "Easy Peasy" (which I say alot) 'Easy Peasy Lemon Squeasy' or is it SQUEEZY? . Well...this project is just that! Check out her tutorial and try for yourself!!

Supplies:
Stamp Set: Toxic Treats (127898 C) Tiny Tags (118592 C)
Card Stock: Very Vanilla, Basic Black, Soft Suede
Ink: Versamark pad (102283)
Access: Log Cabin Smooch Spritz, Soft Suede taffeta ribbon, vintage trinkets, crochette trim, pewter embossing powder, heat tool, punch, sticky strip, decorative label punch, dimensionals, jewelry tag punch


Here is one of the cards that they made using the same stamp set Toxic Treats.


How is opens:
Notice how I added additional bubbles with our basic pearls??

Supplies:
Stamp Set: Toxic Treats
Card Stock: Sahara Sand, Very Vanilla, Tangerine Tango
Ink: Tangerine Tango, Versamark pad, Crumb Cake
Access: pewter embossing powder, heat tool, framelits labels collection, Big Shot, stamping sponges, basic pearls, Big Shot, Vintage Wallpaper embossing folder,

Cute huh? Click here to see how to use 1/2 of the framelit in the big shot to create the 'swing'.
Now...check this out:


Sneak peak: They also made this burlap banner...which I am in the process of filming a video tutorial for...stay tuned!

Here is a close-up. I asked my hubby to make me a fence for above our cabinets and he spray painted it black. Seriously....I LOVE that man...he whipped it up in like 10 minutes!!
Here is the other 'Spooky' side:
Now one more thing to share with you...my latest Halloween decor item...meet 'The Old Hag'..isn't she AMAZING?? She is holding a glowing battery operated tealight candle...I just HAD to have her!!

I can't wait until later today...while football is on~ I will be decorating!!!!!!! All of my boxes/bins have been brought down from the attic. YAY!!!
Then we bowl tonight...another YAY!!!

Contact me if you have any questions!!
Stampin' hugs,
Erin
Shop online 24/7 (even in your P.J.'s)
email: stampingwitherin@yahoo.com
Blogging tips