Monday, February 14, 2011

Happy Valentine's Day!!

Happy Valentine's Day!! I didn't post my video~ don't hate me!! I noted in my previous post that I would be uploading another video tutorial...and I didn't. I have been substitute teaching on occasion and last Friday was asked to sub and I accepted...so no video :( . Don't be sad...it's coming and I actually have more ideas to film too!! Drop me a line, or comment...let me know what you would like to see~ a certain idea or technique...more cards?? scrapbook pages?? I have a birthday coming (shhhhh!). I don't really count birthdays anymore~ that means I don't get any older right?? I would LOVE for Santa (oh wait~wrong holiday)to bring me a new video camera to make filming/editing easier. We'll see!! So I hope you all have had a wonderful Valentine's~ I wanted to share with you some cute treats that my friend Mona and I made~
These hold delicious Ghiradelli chocolates. She made a bunch for her co-workers...pink for the girls and gray for the boys!!
These were so quick and easy to put together using the super cute Table Setting die (116819). I was inspired from the fabulous Kimberly Van Diepen who posted a video on how she made hers...so be sure to check it out...trust me~ that girl could make 'pooh' look pretty!!
Now...on to my lovely Valentine's for the kids~ I posted a picture from a past Stamp Camp where I had one of these little cuties...they are envelopes and it is seriously one of my latest favorite treat holders to make!! These I had filled with gummies...can you believe I found matching ones?? LOVE IT!!!
Here is photo of the inside...shredded Real Red card stock for filler and ta-da~~ my oldest (Tyler: age 15) was so cute...he said "Mom, these are too cute to eat!"
Now...lastnight after we finished up dinner we had some excitement...my husband called me to help him save a baby mouse on our screened in deck. We have cats (bad kitties!) and sometimes they have caught/killed the wildlife...but this was a baby!
So I rushed out to help...along with the kids and we saved the little guy (or girl). I love their ears the most...SO CUTE! I know that there are a lot of you out there that are probably grossed out and thinking...they are just as nasty as cockroaches or something. But seriously... take a look for yourself!!
Now...how in the world did I get two you ask?? About an hour later when my daughter was headed to bed she yelled "Mom..there is another one!" So...we all headed outside and 20 minutes later we caught it...so meet Cupid and Valentine!! Not sure what we we'll do with them...the kids love them want to keep them as pets...I am already crazy with the two cats PLUS two dogs we have!!
That's what it's all about I suppose...catching fireflies or frogs and turtles in the summer? We now have mice until 'spring' has 'sprung' I suppose. Any advice?? Would love some!!
Now... here is what I made for my hubby for Valentine's Day.
A frame and matching 4"x4" card. Hard to see photo because of the flash so here is a close-up:
I also made a catepillar book or some people call them 'squash' books: I took two pictures of them opened because I decorated both sides. Here is the top:
Bottom:
And this photo: all closed-up lookin' pretty!!
Other ingredients listed below: (for all three projects)
Stamp Set: Define Your Life (114950 W)
Card Stock: Whisper White, Pink Pirouette, Basic Gray, Love Impressions DSP (121780)
Ink: Basic Gray
Access: Decorative Label X-large punch (120907), Vintage Trinkets (118764), Bitty Buttons (118761), basic rhinestones (119246), Whister White 5/8" organza ribbon (114319), gray taffeta ribbon (retired), linen thread (104199), Perfect Polka Dots embossing folder (117335), Big Shot (113439), sticky strip (104294), dimensionals (104430), Love Impressions Rub-Ons (121886)
Think he liked all the pink and ruffly ribbon?? This was so fun to make and doesn't need to be JUST for Valentine's Day~ I have always loved this stamp set and I used ALL of the definitions~ hooray for me!! From A-Z ~ the cover uses the 'X' and the last piece or the 'back' as 'Y' & 'Z'. Again...if you have any questions or comments I would love to hear them!! Thanks and until next time~ happy stampin'!
~Erin
Oh...in case you were wondering..silly me~ this is how you create the 'squash' book!!
Directions: Begin with a (2) 8 1/2" square piecea of CS and fold in half vertically and horizontally. Flip over and score diagonally in both directions. Overlap one on top of each other as shown and decorate as desired!! Contact me if you have any questions!

Thursday, February 10, 2011

Mmmmm~ M&M's!!

These M&M treats turned out SO cute!! I used the heart shaped treat cups (120435). Can you believe that for just $2.95 you get twelve of these little cuties?? Love 'em...and had some stashed in my storage closet ...but never played with them!! Pulled off the adhesive and stuck to the DSP~ SO EASY!! These were pretty quick to make too since the circles were punched with the 2 1/2" circle punch (120906) and the larger scallops were done using the Big Shot (who always lives up to his name ) and Scallop Circle #2 die (113469).
Other details:
Stamp Set: Tiny Tags (118091 W, 118592 C)
Card Stock: Real Red, Whisper White and Love Impressions DSP (121780)
Access: Real Red and Whisper White 1/8" taffeta ribbon, linen thread, medium jewelry tag punch, 1/16" handheld punch
Now...here is another great Valentine's idea that is a 'non' cavity promoting gift.
It uses the same fun paper (Love Impressions 121780) found on pg. 7 in the Occasions Mini. This is basically the same concept that I used for the candy bar wrappers but it's flat...can you guess what is inside?? It's an i-tunes gift card!! Added some bling ~ red glimmer paper heart punch (pg.7) and a trinket crown (pg. 24). I LOVE these little guys a set of 3 different custom-designed crowns (121891) for only $6.95 that include both jump rings and lobster claps.
Anyway...just a day away and I'll have my next video to share with you!!
Have a great day!!
~Erin

Monday, February 7, 2011

Matchbox Die "Fantasy Tower"

Hey there~ I am SO excited to share with you this modified 'Fantasy Box'. I was first inspired by this Matchbox Die tower and had added it to my fav's to CASE later....and while watching the Superbowl yesterday I started stampin' the night away...this was SO much fun to make~ I had to revise the measurements to make mine work...see bottom of post for instructions. I know now what my hostesses this month will be receiving!! Here are some close-up pictures:
The colors SCREAM spring and make me all warm and fuzzy!! I love this stamp set...it's from the Occasions Mini Catalog (pg.31). The samples shown in the catalog are very cute but...there was NO way I was about to cut out that butterfly!!
Supplies needed:
Stamp Set: Bold Blossom (123232 W, 122232 C)
Card Stock: Whisper White, Old Olive, Daffodil Delight, Melon Mambo
Ink: Old Olive, Melon Mambo, Daffodil Delight
Accessories: dimensionals, 3/4", 1 1/4", 1 3/8" circle punches, extra-large decorative label punch (120907), linen thread (104199), sweet stitches designer big buttons (122302), daffodil delight 1 1/4" striped grosgrain ribbon (119770), 1/16" handheld punch (101227), Sizzix Bigz XL Matchbox die (114890) and
SAB (Sale-a-Bration): FREE Ice Cream Parlor (122242)
Directions: 1. cut out a total of 4 Matchbox die boxes (you will not need the outside sleeves) 2. Tower: cut CS to 4" x 11" and score at 2 15/16", 5 5/16", 8 1/4" and 10 5/8". Lid: 4 3/8"x 3 3/4" score at 11/16" on all 4 sides. Adhere boxes as shown spaced at each inch. Decorate as desired.
The drawers inside the tower are filled with embellishments: buttons, brads and ribbon~FUN!
Contact me if you have any additional questions or to schedule your workshop so you can have one of these cuties!!
Happy Stampin'
~Erin

Friday, February 4, 2011

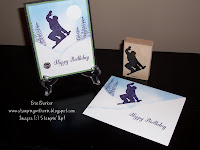
Extreme Snowboard!!

February has always been a busy month for me. Especially since it's a short one~but that's okay because I am SO ready for spring! The quicker the month goes by the better!! No I didn't make a card for Groundhogs's Day...and thinking it's not looking like I'll make any to celebrate President's Day either... BUT I will be busy making TONS of birthday cards. Several family members (including my own) are during this month and a bunch of friends too. Hmm...9 months ago must have been a busy month too!!
Here today the one I have to share is for my son's friend's birthday party. I received an order today of lots of goodies and because of Sale-A-Bration's wonderful promotion I received this set FREE!!
It's called Extreme Snowboard and it's great for boys and teens...I didn't have any other stamp sets that were screaming 'cool' boy stamp set...and with the recent weather we (and about 1/2 of the country) have been having it was perfect!!
Click here for a great tutorial by Michelle Zindorf. I loved her card...and mine isn't even close...I actually am not friends with the brayer..I like to use sponges better. It was so much fun I even decided to stamp the envelope!
Here is the inside:
Remaining card details:
Stamps: Extreme Snowboard (115177), Plant Hope (120540 C, 117042 W), Bring On the Cake (121958 C, 121899 W)
Card Stock: Whisper White, Kiwi Kiss, Basic Black
Ink: Bashful Blue, Basic Black
Accessories: Styled Silver Hodgepodge Hardware (111325), sponges (101610), cutter kit (106958), modern label extra-large (119849)
Have a great day!
~Erin

Tuesday, February 1, 2011

It's a pillow..it's a card~it's a pillow card!

I know what you are thinking...what a tacky title on my post! Over Christmas I kept seeing those 'pillow pets' all over the place and would sing the catchy little tune when the commercials came on...but they never made my kids Chrismtas 'wish-list'! Anyway...this card feels like a little 'heart' pillow. Click here for a great tutorial to give you an idea on how to achieve this look. Here is a picture of the inside (pardon my hand). The Melon Mambo piece of card stock has covered the punched out heart shape, fabric, batting and cover~ta-da!! This card could be used for Valentine's Day or any other occasion for a friend. I think besides the fabric...which I 'sew' LOVE my favorite element on the card are the delicious BUTTONS!! Just wait until you see what I'm making with the buttons next~it's going to freak your freak out!!
Here are the remaining supplies used.
Stamp Set: Love You Much (113756) available in wood mount only
Card Stock: Naturals Ivory, Melon Mambo
Ink: Melon Mambo, Early Espresso
Accessories, Kraft taffeta ribbon, sticky strip, Early Espresso Stampin' Write marker, glue dots, Big Designer Buttons (122301 Springtime Vintage, 122302 Sweet Stitches) and Sweet Stitches fabric (121818)
Take a Spin!!
I am sure that all of you know by now that http://www.splitcoaststampers.com/ is a great site for inspriation and excellent tutorials (besides of course my blog ) so my next card was inspired by a topper card shown here. I LOVE the new game spinners in the Occasions mini~ they are a MUST have!! They coordinate with a new stamp set (shown here) called Take a Spin (121937 W, 122015 C). The topper part of my card was made by using the Top Note die (113463) after it is cut out once, turn it centered and run it through your Big Shot again~ I know genious!! Nope...not my idea but happy to share the technique...you can make a cute star like medallion by continuously turning it and cutting it out. I know that Kimberly Van Diepen made a video showing it awhile back. My Basic Gray CS card base is a 4 1/4" square and I layered both Pumpkin Pie CS and Peach Parfait over it. Hard to tell from the photo but the Peach Parfait piece was embossed using the Square Lattice embossing folder (119976). Added some Pumpkin Pie 1/8" taffeta ribbon (119253) and lastly punched out a few Whisper White candles using the new Build a Cupcake Punch (121807) another MUST have item! I also punched one out on the inside of the card:
Great thing is it still fits inside a standard size envelope!!
Click here to shop 24/7 for supplies used. Let me know if you have any questions, off to play with more buttons!
Stay warm, safe and think 'spring' I hear they are calling for some more ice with a HUGE storm headed our way...YUCK!
Stampin' hugs~Erin
Blogging tips